Hello out there in blogland! I'm back from an art retreat weekend with some very dear and very talented friends! What a blast! The creative juices were spilling over and running from table to table with tons of really fun, cool ideas.
As you know I've been trying to come up with some ideas for how to use my gelli prints. (I have a 'few' as you may recall!) I love the notecards and matching envelopes I posted about previously. They've been a big hit. My next idea was something I was determined to figure out at camp this past weekend, so I limited myself to only half our Navigator full of supplies -- I know, how can I work with that limited selection? I wanted to concentrate on making some journals. I had some visions in mind and I watched tons of YouTube videos to learn about all different ways to bind journals together. I thought I'd share what I came up with, which is a combination of several techniques from YouTube, some ideas from my fellow retreaters, and some of my own as well. Here's what I ended up with...I'm calling them:
GELLI JOURNALS!!!
(I just love how that sounds!)
These three were all made completely by hand. I love the way they turned out!
DEAR LORD -- pay no mind and ask no questions about the Billy-Bob teeth you see in the background!!! Sweet Mary! OMG!!! 
This one and the one below were really easy -- so easy, they were a "Cinch"! (get it???)
~~~~~~~~~~~~~~~~~~~~~~~~~~~~~~~~~~~~~~~~~~~~~~~~~~~~~~~~~~~~
Gelli Journal Tutorial
Since I went thru so many sources to come up with my design, I thought I'd include a little tutorial should you want to try this yourself...
I decided I was going to use some of my double sided gelli prints folded in half, so each page would be 8.5 x 5.5.
I decided to use a heavy duty manila folder as the base for the cover. I cut the manila folder so it was 1/4" larger than the prints on each side.
Prints were 8.5 x 11, folded to 8.5 x 5.5.
Manila folder was cut to 8.75 x 5.75 -- on each side of the center spine.
Finished base cover looked like so...
This ended up working out perfectly. When I first thought about using a manila folder, I wasn't thinking about how you can fold them on the pre-scored lines to make the spine lay flat as you needed more space for papers. The score lines worked out as a perfect guide to align the holes I intended to punch for three signatures. I believe that's what's called a happy accident! Now, if i had any sense at all, I would have said that was part of my design idea in the first place...but no, I cannot tell a lie, happy accident all the way! I'm simply not that smart! LOL Honest, but not smart! Before continuing to the next step, I measured and punched holes for my signatures with my awl. One in the center, and one 1" from the top and one 1" from the bottom edges.

I brought along some really awesome Batik fabrics I purchased at Artistic Artifacts. I used a rotary cutter on my self healing mat to cut the fabric about 1" larger than the folder on all sides. Again, not being a seamstress and not being very smart, I just eyeballed this part. Laying awake last night thinking about making more, it occurred to me that I should have made a template -- hello!!! (Note to self -- make a template you numbskull!)
I follow Shannon Green on YouTube, and she recommends using YES! Paste, so that's what I decided to use to glue the fabric to the folder. The fabric was wrinkled and of course the thought to bring an iron never crossed my mind, but YES! Paste solved that problem. By just smoothing the fabric with my hand, it was perfectly adhered and not a wrinkle to be seen.
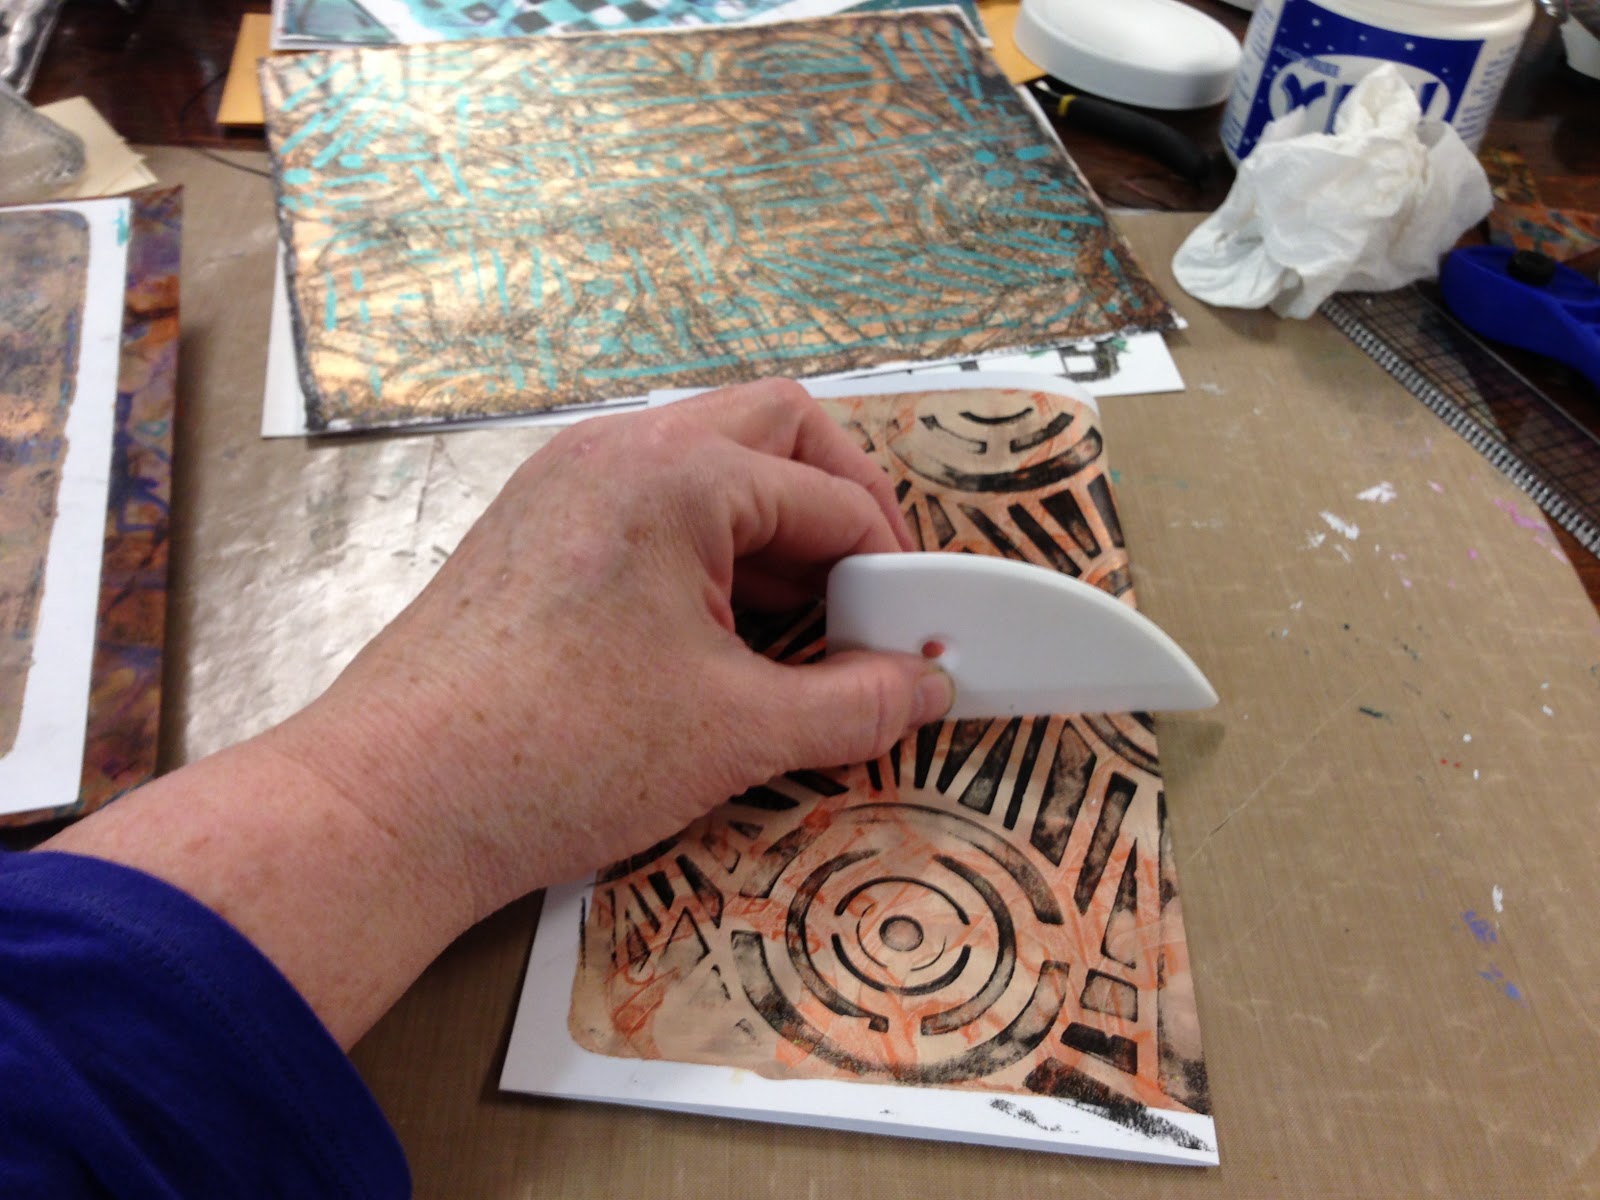
Being the tool-ho that I am, I bought this nifty little tool to help me cut just the right amount off when mitering the corners.
The covered folder inside, and below is the outside. I missed taking a pic of the next step, but its easy enough to just explain. I added about a 1" wide strip of fabric down the center of the inside cover to reinforce the spine. Then I punched holes thru that as well.
Next I rifled thru one of my stacks of gelli prints to decide on one that would match the fabric. I would use the lucky winner as my inside cover. I missed taking a pic of this too. I used PVA glue to adhere the gelli print to the inside of the cover. It was large enough to cover all the folded edges of fabric.
I re-punched the signature holes from the outside of the fabric so they were easy for me to follow. Then it was time to sew the signatures into the spine. I made three signatures, each with 5 full page gelli prints, resulting in 10 double sided printed pages, so 30 pages in all. When you punch your holes in the signatures, be sure they align with the original holes you punched in the cover.
If you look very, very closely, you'll see my binding needle passing thru the inside of the spine between two of the signatures. Had I not punched holes in all the layers of fabric and paper in the spine, I doubt I could have sewn in the signatures. I continued to sew all three signatures in place using black waxed linen thread.
I have a lot of beads since I was a lampworker and jewelry designer in a previous life. I decided to leave one of the center threads in each signature long enough so I could use it to thread on some beads. None in this sample are my lampwork beads. I used some stone beads and some seed beads this time.
In this shot you can see the inside cover print and about how long I left the threads to bead.
I'm finished!!! NO -- NOT YET...
I brought some coin envelopes with me, so I thought I'd fancy one up just a tad, and glue it on the inside cover...just because I could.
I used a couple matching seed beads to add to the makeshift clasp I made.
I used PVA glue to adhere the coin envelope to the inside cover.
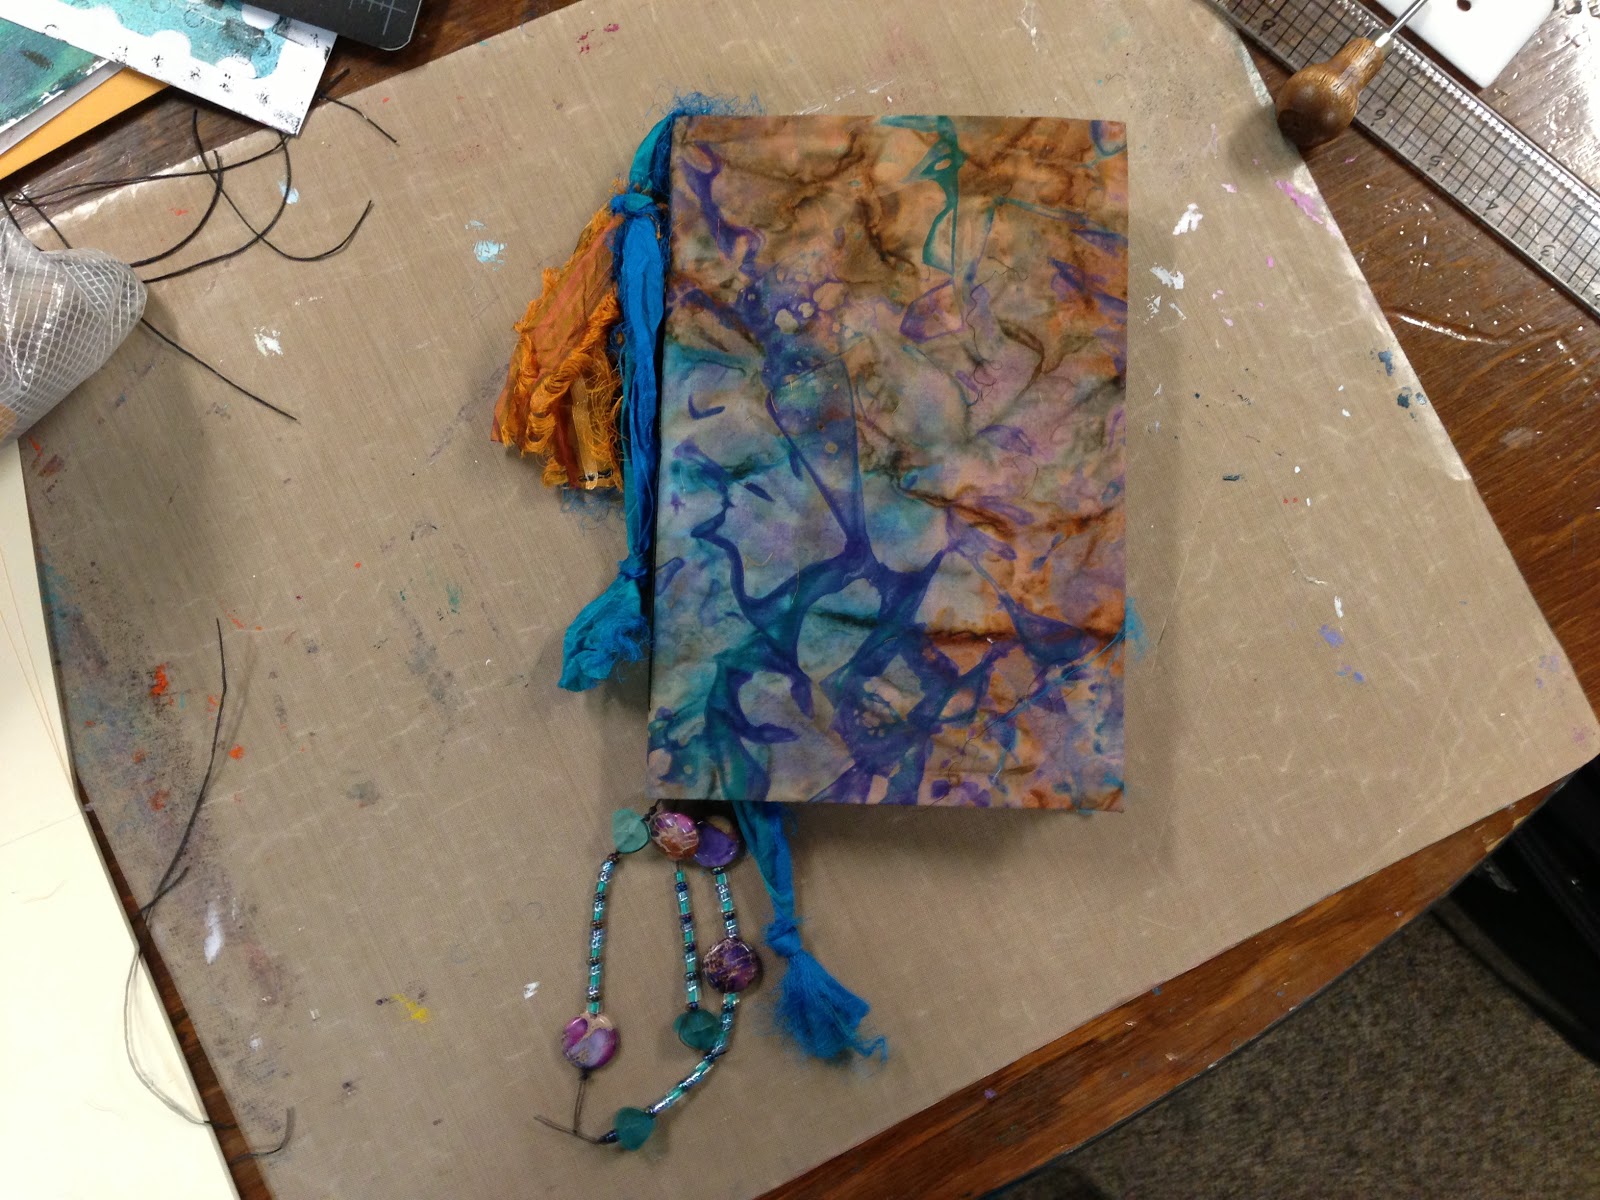
I've had this Sari ribbon in my stash for quite a while and thought I'd pick out some coordinating pieces to tie on the spine.
One of my fellow campers, the fabulous Donna Walsh, suggested using some of the ribbon to use as a page marker - simple yet genius!
Now, I'm finished with this one! Here's the outside.
And here's the inside front cover with envelope.
And the ribbon page marker! How cute is that???
~~~~~~~~~~~~~~~~~~~~~~~~~~~~~~~~~~~~~~~~~
I was so excited to get started, that I actually finished two other books before I remembered to stop and take some pics during the process so I could write a blog about my process. This is actually the very first one I made. I was really pleased with how it turned out!
Random inside pages.
And I love this fabric!
Speaking of loving fabric - OMG!!! This is even more gorgeous in person! My fellow camper and roommate, the fabulous Ellen Vargo, suggested cutting the Sari ribbons to make a cropped bushy effect on the spine. LOVE!
And this one has a page marker as well.
~~~~~~~~~~~~~~~~~~~~~~~~~~~~~~~~~~~~~~~~~~~~~~~~~~~~~~~~~~~
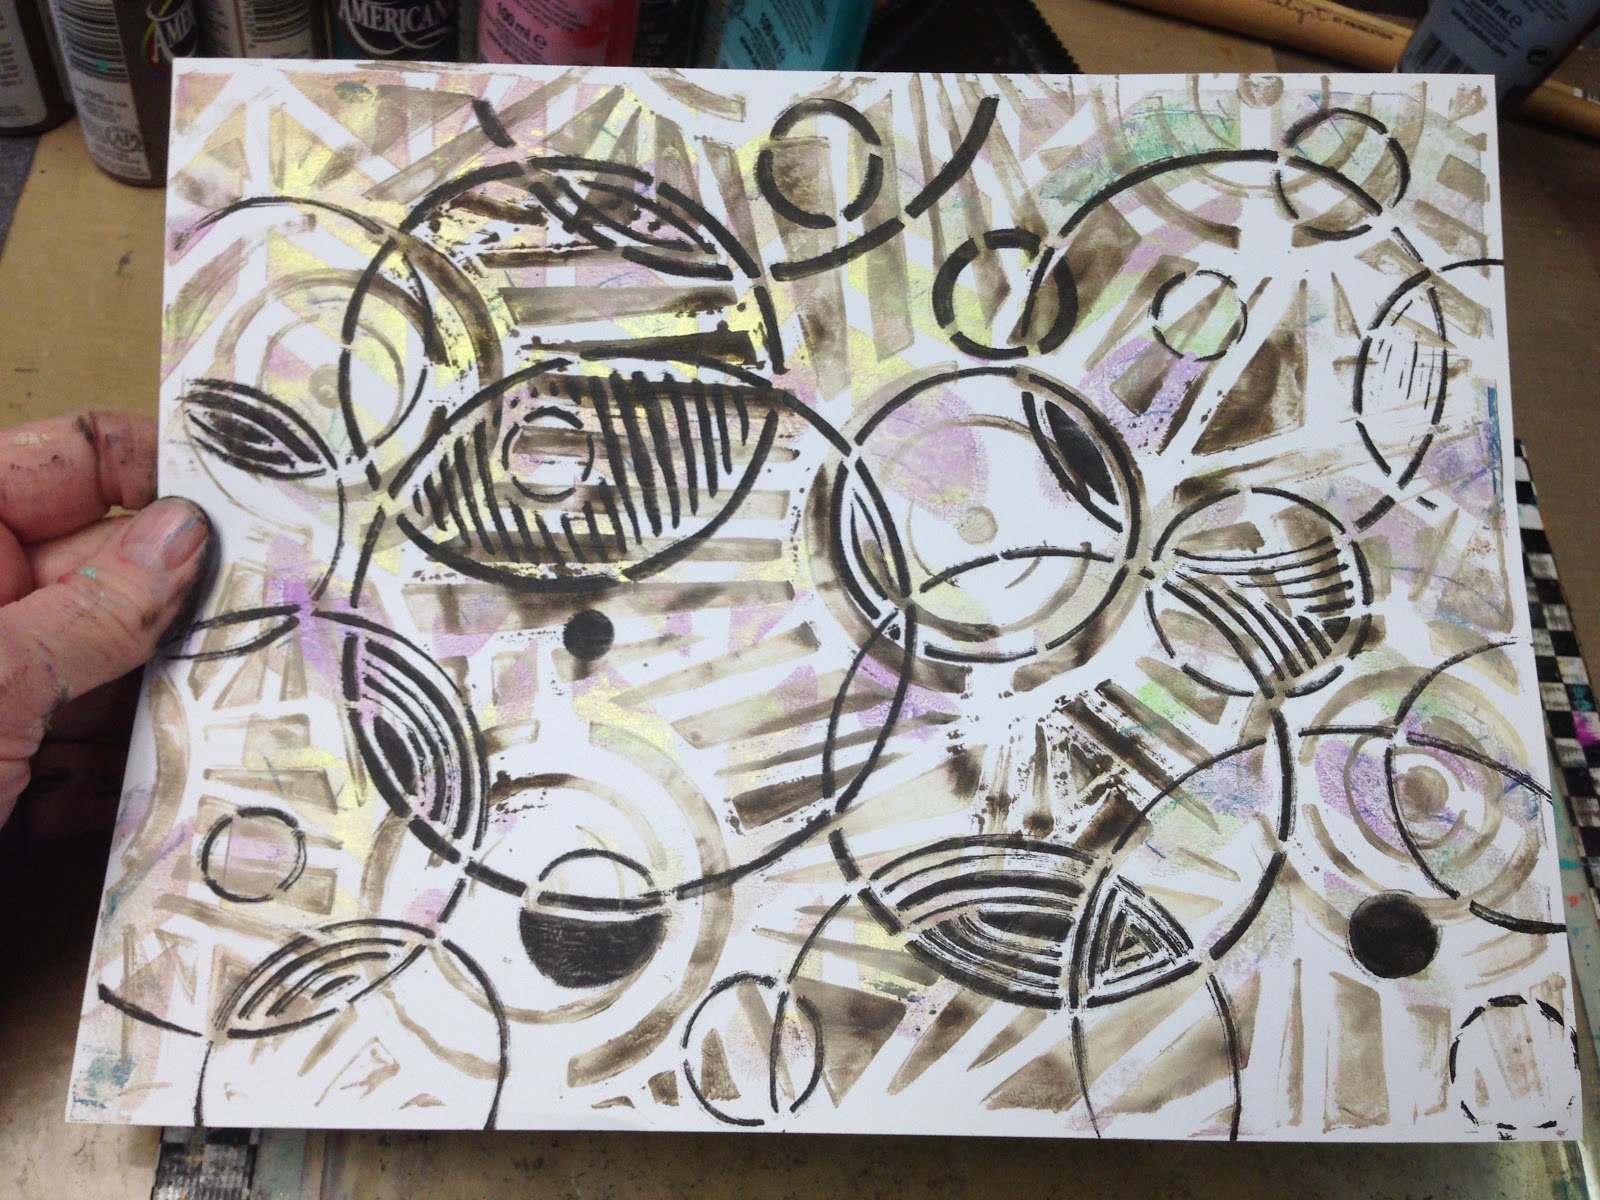
I brought my Cinch machine with me, so I thought I'd use it to whip up a couple gelli journals (I really like how that just rolls off the tongue!) -- much faster than the previous process! For these I cut the pages in half rather than folding them. I decorated the covers with some circle punched gelli prints and ribbon on one, then used some Viva Decor Hologram 3D Gel scraped thru a stencil on the other.
Some random inside pages.
I finally hit the lighting just right in these two pics to show the Hologram Gel off a bit. Cool stuff!
~~~~~~~~~~~~~~~~~~~~~~~~~~~~~~~~~~~~~~~~~~
We are preparing for a huge yard sale at home, but depending on my free time this week, I'm going to try to do a quick video flip thru of all these books. AND, for those of you who have read this far, you'll be the first to know about another iStencil deal you will NOT want to miss out on! Stay tuned for the teaser video coming out this weekend! And you thought the last one was good??? Just wait!!! Trust me, do NOT miss out on this one!
I hope you had as fun a weekend as we had at art camp! So cool to be around such fun, creative, like-minded and loving women. Can't wait til the next time!
I'm going to Art & Soul the end of this month in Virginia Beach!!! Are you going? Please leave a comment and let me know if you are and we'll try to meet in person!
Happy arting!!!
Patti


